Remember when I showed you all the cool services running on my Raspberry Pi 5? Well, it turns out that same little machine is capable of much more than just home automation and other selfhosting staff. We recently launched an e-commerce shop, Zenoire and you guessed it - it’s running on that very same Pi 5.
This post is a deep dive into the tech, the tweaks and the real-world performance of running a small production shop on a tiny, self-hosted server. Spoiler alert: the results were surprisingly good.
The Tech Stack: Why These Choices?
Building a shop from scratch means you get to pick your favorite toys. Here’s what we went with and why:
- Frontend: Next.js + TypeScript. For an e-commerce site, SEO and fast page loads are non-negotiable. Next.js gives us server-side rendering out of the box and TypeScript keeps our codebase clean and predictable.
- Backend: Golang. This was the best choice for performance. Go is ridiculously fast, has a tiny memory footprint and feels perfectly on the Pi’s ARM architecture. It’s a compiled language, which means all errors are caught before the code even runs.
- Reverse Proxy: Caddy. If you are still fighting with nginx for personal projects, you have to check out Caddy. It offers automatic HTTPS, simple configuration and fantastic performance, especially on resource-constrained hardware like the Pi.
You might be asking, “Why not Node.js for the backend?” I was curious too and tried it… Stick around and I’ll show you a memory usage comparison that makes the case for Go much clear.
Caddy: The Secret Weapon for Easy HTTPS
I can’t say enough good things about Caddy. Caddy handles everything you need, automatically.
Here’s my entire Caddyfile for the shop. It includes routing for two domains and some security headers.
(security_headers) {
    header {
        Strict-Transport-Security "max-age=31536000; includeSubDomains; preload"
        Permissions-Policy "geolocation=(), microphone=(), camera=(), payment=(), usb=(), vr=(), interest-cohort=(), sync-xhr=()"
        X-Frame-Options "SAMEORIGIN"
        X-Content-Type-Options "nosniff"
        Referrer-Policy "strict-origin-when-cross-origin"
        Content-Security-Policy "default-src 'self'; script-src 'self' 'unsafe-eval'; style-src 'self' 'unsafe-inline'; img-src 'self' data:; frame-ancestors 'self'; form-action 'self';"
        Cross-Origin-Embedder-Policy "require-corp"
        Cross-Origin-Opener-Policy "same-origin"
        Cross-Origin-Resource-Policy "same-origin"
    }
}

lantern.zenoire.org {
    import security_headers

    # Route API requests to the backend
    handle_path /api/* {
        reverse_proxy lantern-zenoire-backend:3000
    }

    # Route all other requests to the frontend
    handle {
        reverse_proxy lantern-zenoire-frontend:3000
    }
}


zenoire.org {
    import security_headers

    # Route API requests to the backend
    handle /api/* {
        reverse_proxy zenoire-backend:3000
    }

    # Route all other requests to the frontend
    handle {
        reverse_proxy zenoire-frontend:3000
    }
}
That’s it. Caddy automatically provisions and renews SSL certificates from Let's Encrypt. The configuration is clean, readable and just perfectly works.
Docker Setup: Containerizing the Shop
Everything runs in Docker, orchestrated with Docker Compose. This makes our entire stack portable, reproducible and incredibly easy to manage.
Backend Dockerfile (Golang)
This is a classic multi-stage build. The final result is a secure minimal container.
# Stage 1: Build the Go binary
FROM golang:1.23-alpine AS builder
WORKDIR /app

# Install git for private dependencies if needed
RUN apk add --no-cache git

# Cache dependencies
COPY go.mod go.sum ./
RUN go mod download

# Copy source and build
COPY . .
RUN CGO_ENABLED=0 GOOS=linux go build -a -installsuffix cgo -o main .

# Stage 2: Create the final, minimal image
FROM alpine:latest
WORKDIR /root/

# Add certificates and timezone data
RUN apk --no-cache add ca-certificates tzdata

# Copy only the compiled binary from the builder stage
COPY --from=builder /app/main .

EXPOSE 3000
CMD ["./main"]
Frontend Dockerfile (Next.js)
The frontend build is also multi-stage to keep the final image as optimized as possible.
# Stage 1: Build the Next.js app
FROM node:20-alpine AS builder
WORKDIR /app
RUN npm install -g pnpm

# Cache and install dependencies
COPY package.json pnpm-lock.yaml ./
RUN pnpm install --prod

# Copy source and build the app
COPY . .
ENV NEXT_TELEMETRY_DISABLED 1
RUN pnpm build

# Stage 2: Create the final production image
FROM node:20-alpine AS runner
WORKDIR /app
ENV NODE_ENV=production
ENV NEXT_TELEMETRY_DISABLED 1
ENV HOSTNAME=0.0.0.0

# Copy only the necessary artifacts from the builder
COPY --from=builder /app/.next/standalone ./
COPY --from=builder /app/.next/static ./.next/static
COPY --from=builder /app/public ./public

EXPOSE 3000
CMD ["node", "server.js"]
Why this setup is great:
- PNPM: I use
pnpmfor faster installs and more efficient disk space usage. - Standalone Output: Next.js’s
standaloneoutput mode packages only the necessary files, reducing the image size compared to copying the entirenode_modulesfolder. - Minimal Final Image: We only copy the built assets to the final
runnerstage, leaving all the development dependencies behind.
Docker Compose Configuration
This file connects everything together. It defines the frontend and backend services and connects them to a shared network that Caddy container can also access.
version: '3.8'

services:
  backend:
    build: ./backend
    container_name: shop-backend
    restart: unless-stopped
    env_file:
      - ./backend/.env
    networks:
      - applications

  frontend:
    build: ./frontend
    container_name: shop-frontend
    restart: unless-stopped
    depends_on:
      - backend
    networks:
      - applications

networks:
  applications:
    external: true
    name: applications
With this in place, deploying the entire stack is as simple as running docker compose up -d.
Image Optimization: Speed Matters
In e-commerce, site speed directly impacts everything. Since images are often the heaviest part of a page, I got serious about optimizing them. A couple of open-source tools did wonders.
For PNGs (logos, icons), I used oxipng:
# -o 4: A high optimization level
# --strip safe: Removes non-critical metadata
# --alpha: Optimizes transparency
oxipng -o 4 --strip safe --alpha *.png
This command shrunk product photos by 45-60% with no visible loss in quality.
For JPGs (product photos), I used jpegoptim:
# --strip-all: Removes all metadata (EXIF data, comments)
# --all-progressive: Makes images load progressively for a better user experience
jpegoptim --strip-all --all-progressive *.jpg
This shrunk our product photos by another 30-40%.
The impact was very big:
- Before: Average page size was 3.2 MB, Lighthouse score was 72.
- After: Average page size dropped to 1.4 MB (~56% reduction) and the Lighthouse score jumped to 94.
You can easily automate this with a simple shell script in your CI/CD pipeline, ensuring all new images get optimized automatically.
Performance: Real Numbers from Production
This is the fun part. How does this setup actually hold up? Thanks to my Beszel monitoring setup, I have the data.
Golang Backend: Lean and Mean
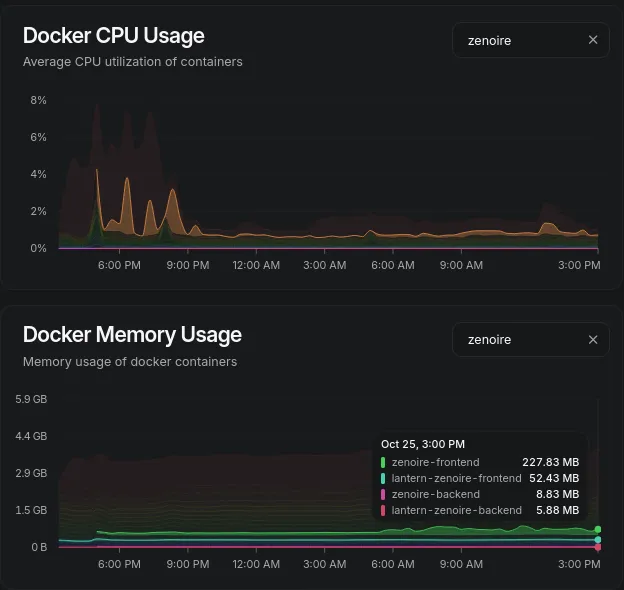
The Go backend is incredibly efficient. It uses minimal resources.
- CPU Usage: Consistently sits at <1%.
- Memory Usage: Hovers between 7-9MB. Yes, megabytes.
- Response Time: A snappy 15-35ms for most API calls.
Even under load, the memory usage rarely creeps above 15MB. It’s the perfect choice for a memory-constrained device like the Pi.
Node.js vs. Golang: A Tale of Two Backends
Before committing to Go, I built a prototype in Node.js. The difference in resource usage was huge.
- Node.js Backend (same workload): Used 45-80 MB of RAM.
- Golang Backend: Used 7-9 MB of RAM.
That’s an 85-90% reduction in memory usage!
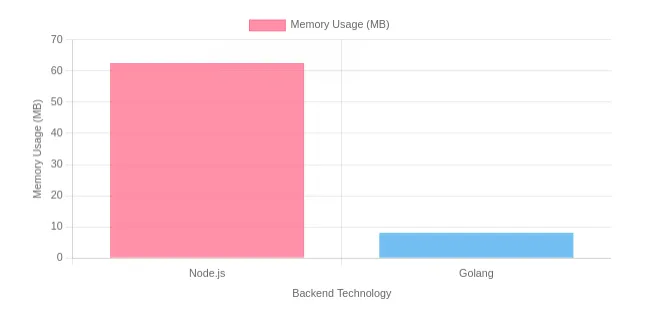
On a Raspberry Pi sharing its 8GB of RAM with a lot of other services, saving over 80MB is a massive win. It means more space for everything else and a more stable system overall.
Lessons Learned From Taking the Pi to Production
- ARM is awesome. I was seriously impressed. I hit zero compatibility issues. Golang has fantastic ARM support and
arm64Docker images are common. - Every Megabyte of RAM Counts. With only 8GB to go around, choosing efficient tech is critical. Golang was a game-changer here. That 85% memory reduction wasn’t just a cool statistic, it meant I could run more services without stressing the system.
- Startup Time Is a Feature. The Golang app starts in under 100ms, making deployments and restarts completely seamless. The Next.js app takes a few seconds, which required more careful orchestration during updates. Fast startup times make rollbacks and updates less stressful.
- Security Headers Are an Easy Win. Using Caddy’s snippet system, it took about 10 minutes to add strong security headers to the site. It’s a simple step that improves your security posture and makes security scanners happy.
What’s Next: A Sneak Peek at My New Project
While building the shop, I spent a lot of time working with various APIs. It sparked an idea and I’m now deep into building a web app to make interacting with Salesforce Data Cloud APIs much more intuitive.
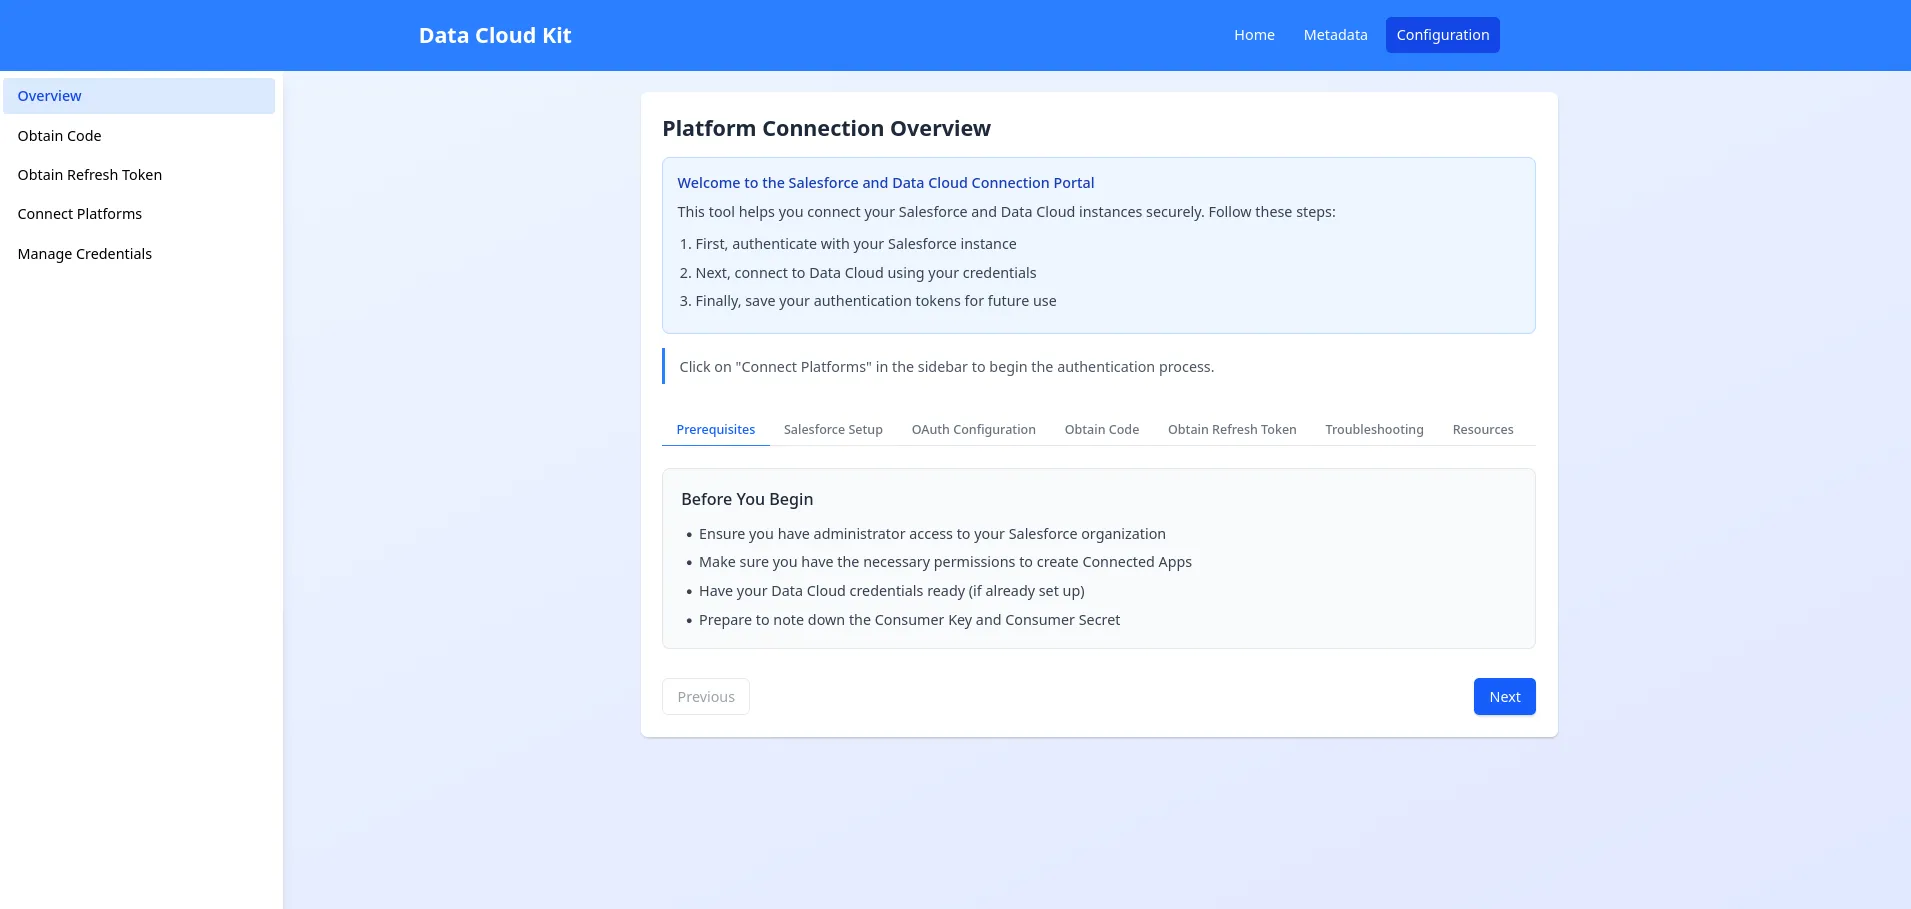
The goal is to create a clean, developer and non-tech user-friendly interface for exploring endpoints, testing calls and managing credentials securely.
Final Thoughts
So, can you run a real e-commerce shop on a Raspberry Pi? Absolutely. For small to medium operations, the combination of modern open-source tools, an efficient language like Go and some optimization makes it not just possible, but it’s practical.
The best part? The total hardware cost was under $200 and it uses about 15W of power. When you compare that to monthly cloud hosting fees, the value is very noticeable.
If you are a homelabber or just curious about self-hosting, I hope this inspires you to give it a try. The learning experience is priceless and there’s a unique satisfaction in running your own production infrastructure.