Let’s be honest, our digital lives are constantly being monetized through non-stop ads and persistent tracking. Taking back some control can feel pretty empowering, almost like a small way of taking charge. If you’re tired of the digital noise, concerned about your online privacy and looking for a faster, cleaner web, then self-hosting Pi-hole on a RaspberryPi is a project you’ll wish you’d started sooner. This guide will walk you through transforming that tiny computer into a powerful, network-wide ad-blocking security guard.
Table of Contents
Open Table of Contents
- What Exactly is Pi-hole?
- Why You Need Pi-hole in Your Digital Life
- What Pi-hole Doesn’t Do
- Your Pi-hole Toolkit: Hardware & Software
- Laying the Foundation: Core Configuration
- Supercharging Pi-hole: Advanced Features & Customizations
- The Command Center: Pi-hole Admin Dashboard
- Curating Your Defense: Blocklists (Adlists)
- Fine-Tuning: Whitelisting, Blacklisting and Regex Magic
- For Ultimate Privacy: Unbound as Your Recursive Resolver
- Stopping Evasion: Preventing DNS Bypass (Advanced)
- Tailored Protection: Device Management with Groups
- Taking Full Control: Pi-hole as Your DHCP Server
- The Pi-hole Lifestyle: Daily Use and Maintenance
- The Big Question: Is Pi-hole Worth the Effort?
- Final Thoughts
What Exactly is Pi-hole?
So, what’s Pi-hole all about? In a nutshell, it’s a DNS sinkhole. Think of it like a super-smart bouncer for all your network’s internet requests. When any gadget on your network - your laptop, phone, smart TV, maybe even that Wi-Fi toaster tries to visit a website, it first asks Pi-hole for directions (the IP address). If that website is on Pi-hole’s “naughty list” (known for dishing out ads, trackers, etc.), Pi-hole basically tells your device, ” Nope, doesn’t exist!” The cool part? That annoying ad or tracker never even makes it to your screen.
While it was born on the RaspberryPi, Pi-hole does more than just removing ads:
- Boosts Your Privacy: Stops a ton of trackers from building a creepy profile of what you do online.
- Speeds Things Up: Web pages often load way faster and you save bandwidth because you’re not downloading tons of ad junk.
- Beefs Up Security: Actively blocks access to known malicious domains, reducing your exposure to malware and phishing.
- Protects Everything: Works for every single device on your network and you don’t need to install anything on them individually.
Why You Need Pi-hole in Your Digital Life
Let’s face it, the internet today, as amazing as it is, can also be a real headache. As one writer put it, browsing in 2020th feels like “fielding a barrage of ads, malicious scripts, analytics widgets… and other things that you probably didn’t want to have to deal with.” Pi-hole is like your own personal digital sanctuary.
Just think about this: users often report Pi-hole blocking over 60% of all DNS requests on their network, all without messing up their browsing. It’s a real eye-opener to see just how much background noise and unwanted stuff usually fills our connections. With Pi-hole, you get back your bandwidth, cut down on distractions and make your online world a much calmer place.
What Pi-hole Doesn’t Do
Now, Pi-hole is fantastic, but it’s not a magic wand. It’s good to know what it doesn’t do:
- It’s not a full firewall: It blocks suspicious websites, not all the random traffic flying around.
- It’s not a VPN: It won’t encrypt your internet traffic or hide your IP address from the sites you visit.
- It’s not a silver bullet for phishing/malware: It definitely helps, but smart browsing habits and proper security software are still your best friends.
- It might not catch every single ad: Ads that come from the same place as the main content (like on YouTube or some social media sites) are trickier to block this way. A browser-based ad-blocker can be a good teammate for Pi-hole here.
Think of Pi-hole as one really important tool in your digital toolkit for better privacy and a less annoying online life.
Your Pi-hole Toolkit: Hardware & Software
The good news? Getting started is easier than you might think:
Hardware:
- RaspberryPi: Pretty much any model will do the trick. A RaspberryPi 3 or 4 is popular, but even an older Pi 2 or a Pi Zero W (though wired Ethernet is always better for a DNS server) can handle Pi-hole like. As one guide rightly says, a 2GB Pi is “total overkill.”
- microSD Card: A decent quality 8GB or 16GB card is plenty. You’re looking for reliability and speed here, not massive storage.
- Power Supply & Ethernet Cable: Just your standard Pi accessories.
Software:
- RaspberryPi OS Lite (64-bit recommended): A stripped-down server OS is all you need, no need for a fancy desktop.
- RaspberryPi Imager: This brilliant little tool makes flashing the OS a breeze and even lets you pre-set important stuff like hostname, SSH access and your username/password.
To kick things off, you’ll use the Imager to get your SD card ready, boot up the Pi, make sure it’s plugged into your network with an Ethernet cable and then hop onto it using SSH from another computer.
Laying the Foundation: Core Configuration
Getting these first few things right is key to a happy Pi-hole life.
The Indispensable Static IP Address
This is a big one: your Pi-hole needs a static IP address on your local network. If its IP address keeps changing, your devices won’t know where to send their internet requests and everything will just stop working. You’ve got two main ways to do this:
- DHCP Reservation (Recommended): Tell your router to always give your Pi-hole’s MAC address the same IP. This is usually the easiest and most hassle-free way.
- Static IP on the Pi: Manually tweak network config files (like
/etc/dhcpcd.confon RaspberryPi OS) to set a static IP. If you go this route, don’t forget to reboot the Pi before you install Pi-hole.
The Pi-hole installer will really drive this home - a static IP is non-negotiable!
Installing the Pi-hole Software
Alright, is your RaspberryPi ready and set up with a static IP? Installing Pi-hole itself is just a single command:
curl -sSL https://install.pi-hole.net | bashThis kicks off a super handy text-based setup wizard. It’ll ask you a few things:
- To confirm your network settings (IP address, gateway).
- To pick an upstream DNS provider (like Cloudflare or Google). Don’t worry too much about this choice - you can easily change it later, or even become your own provider with Unbound (more on that in a bit!).
- To accept the default blocklist (it’s a solid starting point).
- Installing the Admin Web Interface (you definitely want this!).
- Enabling query logging (super useful for figuring things out later).
Once it’s done, make a note of the randomly generated admin password (you’ll change this) and your Pi-hole’s IP address.
First thing you should do is change that admin password by SSHing into your Pi and running:
pihole -a -p YOUR_NEW_PASSWORD.
Directing Your Network’s DNS Traffic
Next up, you need to tell all the devices on your network to start using your Pi-hole.
- The Manual Way (Not Recommended): Go into each device’s network settings one by one and change its DNS server to your Pi-hole’s IP. This gets old fast, especially if you have lots of devices.
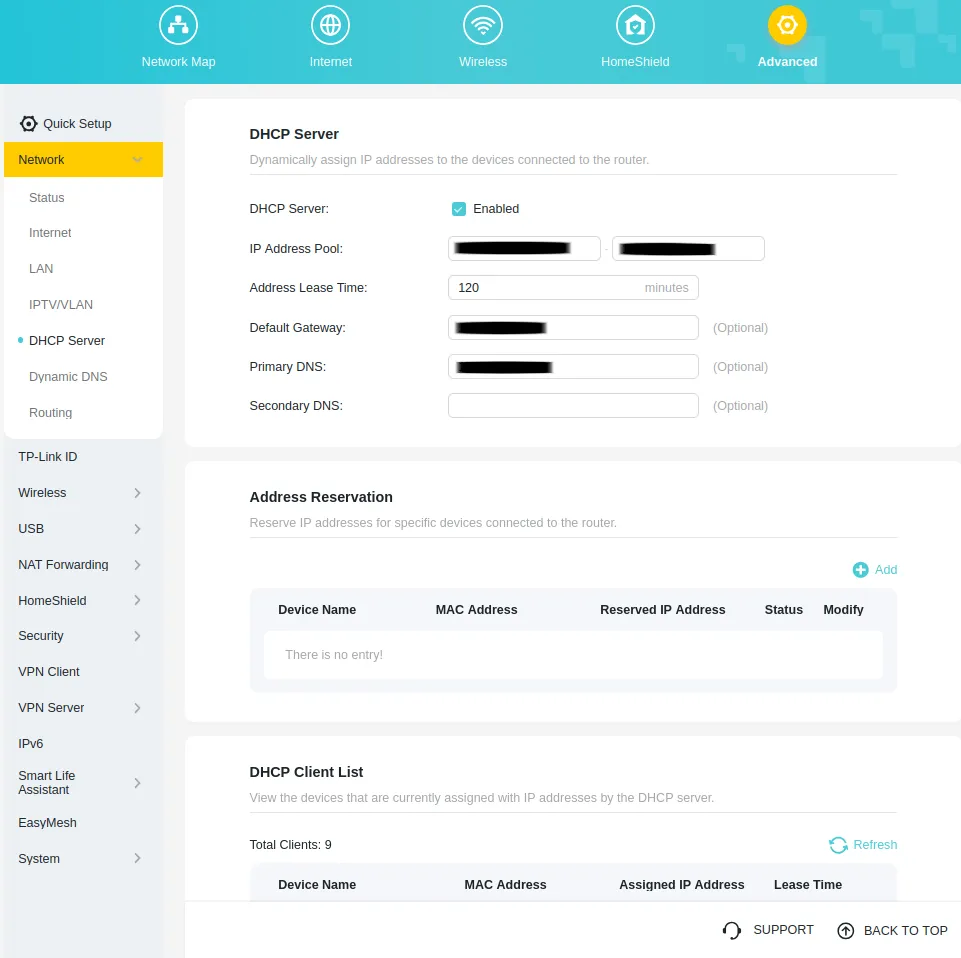
- The Router Way (Highly Recommended): Log into your router’s admin page and find its DHCP server settings. Change the main DNS server it hands out to your Pi-hole’s IP address. That way, any device that joins your network automatically uses Pi-hole. If you happen to have a second Pi-hole for backup, add its IP as the secondary DNS. Otherwise, you could leave the secondary DNS blank or point it to a trusted public DNS server as a backup (though for max blocking, just using Pi-hole is best).
Supercharging Pi-hole: Advanced Features & Customizations
The basic Pi-hole setup is awesome, but the real fun begins when you dive into its advanced features.
The Command Center: Pi-hole Admin Dashboard
You can get to your Pi-hole’s control panel by typing http://<PIHOLE_IP_ADDRESS>/admin into your browser.
Here’s what you’ll find:
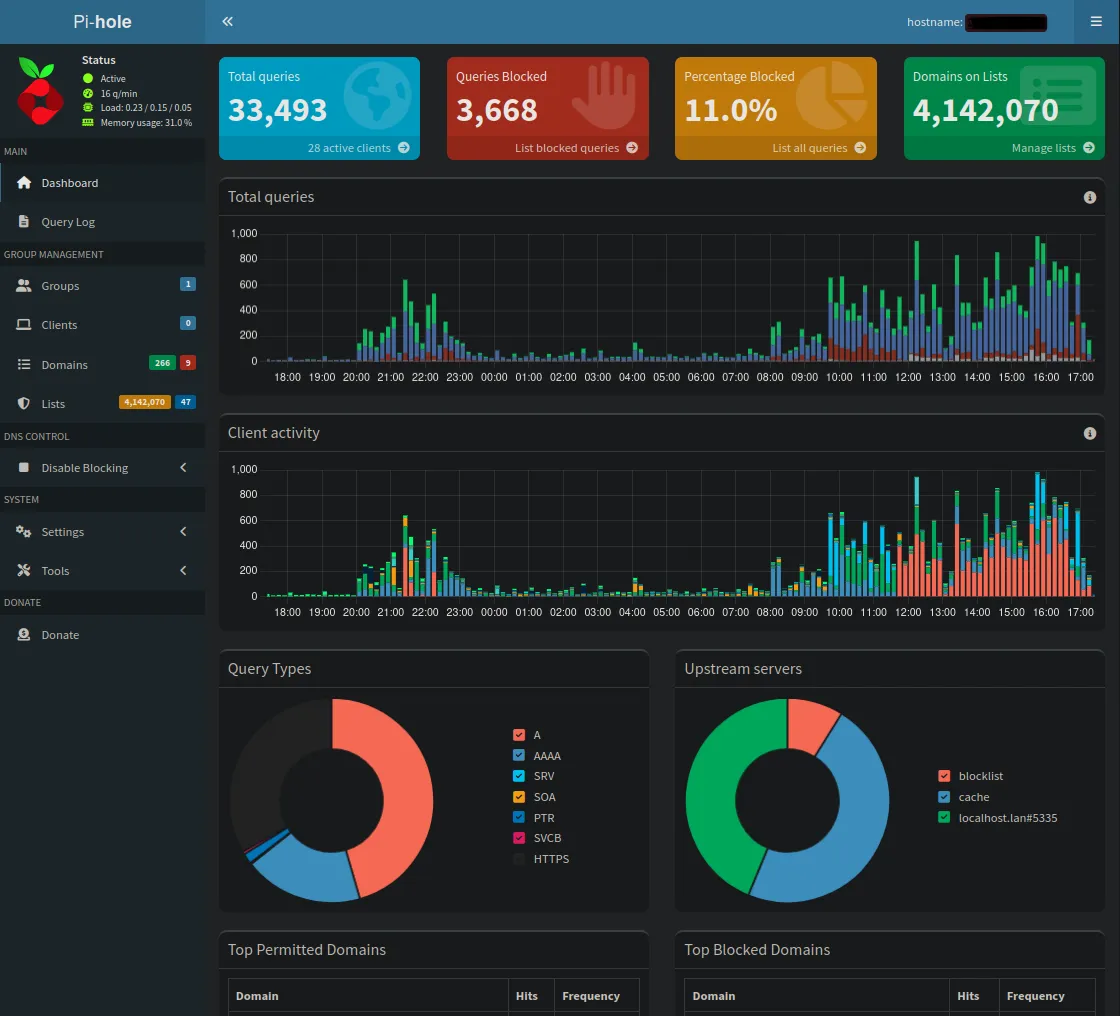
- Quick Stats: Total requests, blocked requests, percentage blocked and how many domains are on your blocklists. It’s seriously satisfying to watch these numbers go up!
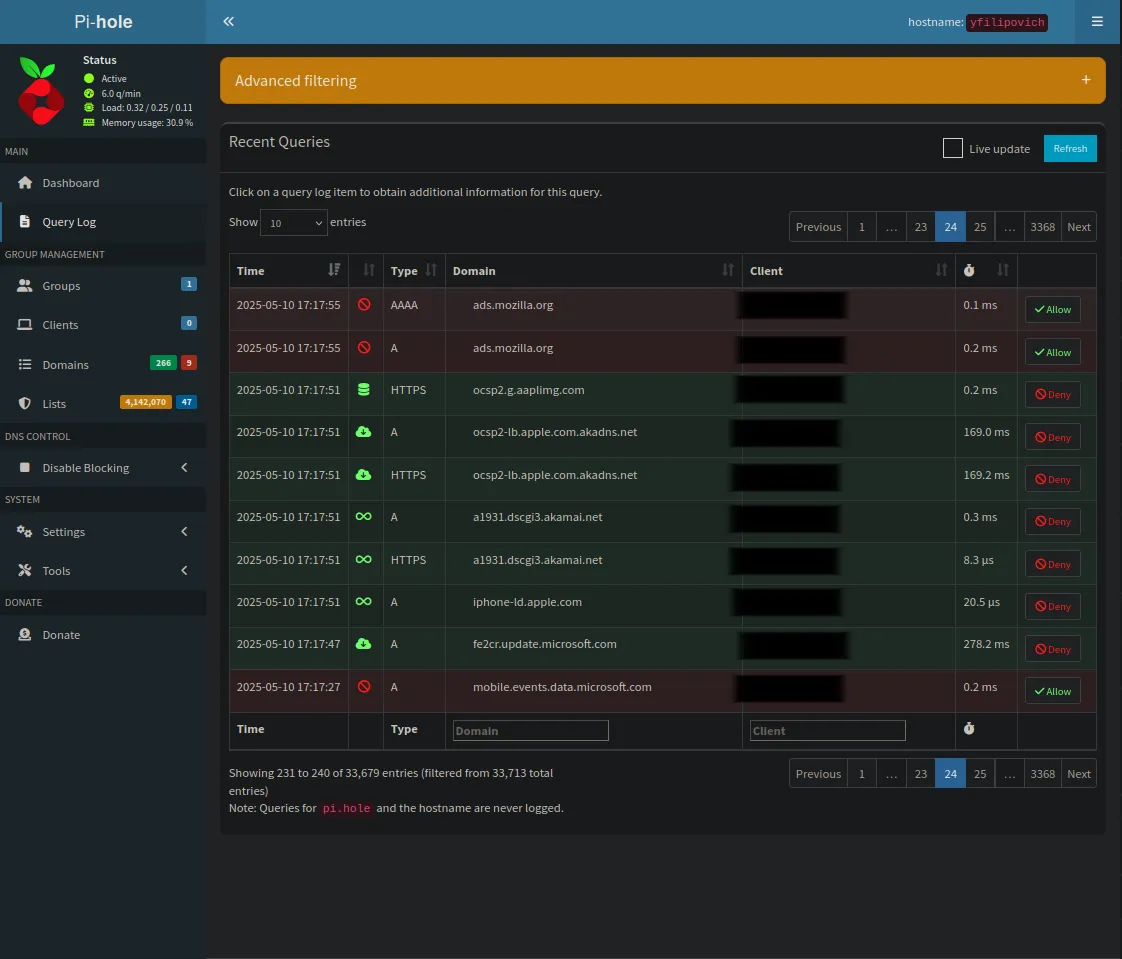
- Query Log: A live feed of all the DNS requests happening on your network. You can see what’s allowed, what’s blocked and which list blocked it. You can even whitelist or blacklist stuff directly from here.
- Long-Term Data: Cool graphs and filterable data to really dig into what your network’s been up to.
Curating Your Defense: Blocklists (Adlists)
Pi-hole uses “adlists” (or just blocklists) to know which websites to block.
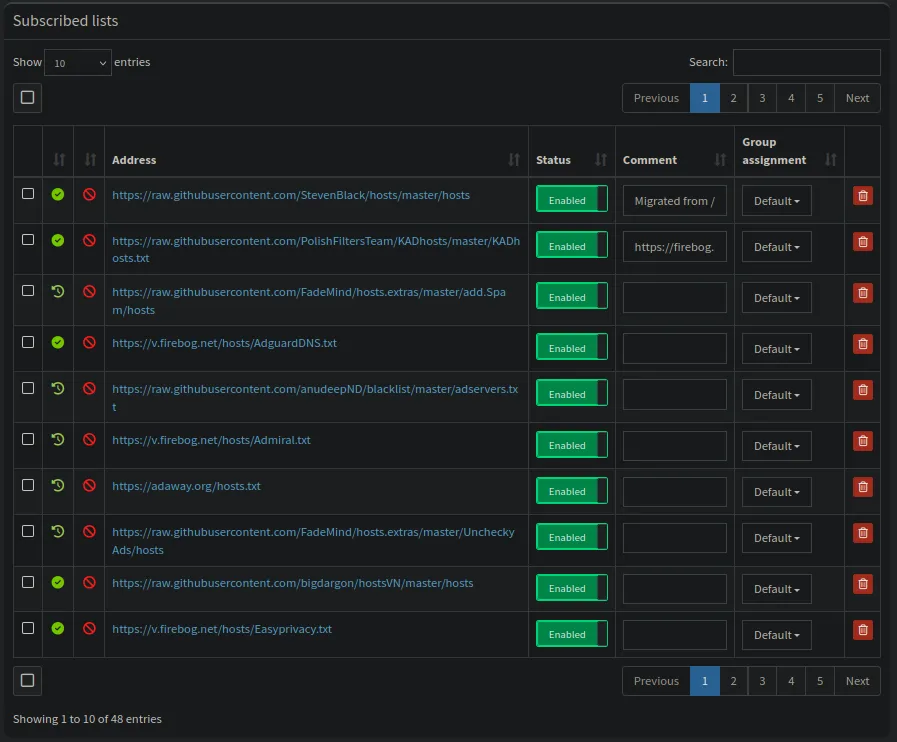
- The default list is pretty good, but you can add loads more. The Firebog is your go-to, well-organized source for extra lists (Suspicious, Advertising, Tracking, Malicious, etc.). Start with lists that have a green tick - they’re usually less likely to accidentally block good stuff.
- Adding lists is a piece of cake via the “Adlists” section in the web interface.
- After you add or remove lists, head over to Tools -> Update Gravity and click “Update.” This tells Pi-hole to rebuild its master list of blocked sites.
- Just a heads-up: more isn’t always better. Super aggressive blocklists can sometimes break websites. It’s about finding a balance you’re comfortable tweaking.
Fine-Tuning: Whitelisting, Blacklisting and Regex Magic
- Domain Management: In the “Domains” section, you can tell Pi-hole to Whitelist (never block) or **Blacklist ** (always block) specific websites. This is super handy if a service you need gets accidentally blocked. The Pi-hole community even has lists of common sites to whitelist for popular services.
- Regular Expressions (Regex): For some serious fine-grained control, you can block (or allow) sites based on
patterns. For example, if you wanted to block whole internet zones like
.ruor.cn, you could use a regex like(^|\.)(cn|ru|hk)$.
For Ultimate Privacy: Unbound as Your Recursive Resolver
Normally, when Pi-hole needs an IP address for a site that’s not on a blocklist, it asks an “upstream” public DNS provider (like Cloudflare or Google). But if you want maximum privacy and don’t want to send your DNS requests to any third party, you can run Unbound - your very own recursive DNS resolver, right there on the same RaspberryPi.
- How Unbound Rolls: Instead of just asking Google or Cloudflare, Unbound goes right to the source. It queries the internet’s root DNS servers, then the TLD servers and so on, following the trail to the official nameserver for the website you want.
- The Payoff: No single company gets to see all your internet queries. You seriously boost your privacy and rely less on outside services. Plus, it supports DNSSEC validation right out of the box.
- Setting it Up:
- Install Unbound:
sudo apt install unbound -y - Create an Unbound config file (
/etc/unbound/unbound.conf.d/pi-hole.conf). The official Pi-hole docs have an excellent, secure example config. Key things are to make it listen on127.0.0.1port5335and turn on DNSSEC. - Restart Unbound:
sudo service unbound restart - In Pi-hole’s Admin page (Settings -> DNS), uncheck all the public upstream DNS servers and add
127.0.0.1#5335as your one and only Custom Upstream DNS Server.
- Install Unbound:
Stopping Evasion: Preventing DNS Bypass (Advanced)
Some sneaky devices (especially “smart” TVs) might try to get around Pi-hole by using hard-coded DNS servers or by manually changing their device’s DNS settings. You can fight back with firewall rules on your router that grab all DNS traffic (TCP/UDP port 53) and force it through your Pi-hole.
- This setup really depends on your router. On UniFi gear, you might use
iptablesNAT rules. On OpenWRT, you can use firewall port forwards. - Example
iptablesidea (swap in your Pi-hole’s IP):sudo iptables -t nat -A PREROUTING ! -s YOUR_PIHOLE_IP -p udp --dport 53 -j DNAT --to-destination YOUR_PIHOLE_IP:53 sudo iptables -t nat -A PREROUTING ! -s YOUR_PIHOLE_IP -p tcp --dport 53 -j DNAT --to-destination YOUR_PIHOLE_IP:53 - Heads Up: This is definitely an advanced move. Get it wrong and you could mess up your network. So, do your homework for your specific router model.
Tailored Protection: Device Management with Groups
Pi-hole’s Group Management is where things get really smart. You can put different devices on your network into different groups and then give each group its own set of adlists or blocking rules.
- Default Group: Your regular blocking policy for most of your gadgets.
- Guest Group: Maybe you want a more relaxed policy for guests, or even a “free-for-all” group with no blocking.
- Kids Group: Apply tougher blocklists, including ones for adult content.
- IoT Devices: You might want a super strict policy for your smart home gadgets, maybe blocking all internet except for the specific services they absolutely need, or even blocking all DNS if they only talk to other things on your local network.
Taking Full Control: Pi-hole as Your DHCP Server
If your router’s DHCP server is a bit basic, or won’t let you point DNS to your Pi-hole, no worries! Pi-hole can step in and handle DHCP for your whole network. This makes sure all devices automatically get set up to use Pi-hole for DNS and gives you even deeper control over who gets what IP address. You’ll find this under Settings -> DHCP in the admin interface. Just remember to turn off the DHCP server on your router if you turn it on in Pi-hole!
The Pi-hole Lifestyle: Daily Use and Maintenance
- “Help, the Internet’s Broken!”: Sometimes, a perfectly good website or service might get caught in the crossfire. First thing to try is temporarily disabling Pi-hole (from the admin menu) for a few minutes. If that fixes it, dive into the Query Log to see what got blocked and add it to your whitelist.
- Quick Disable Lifesaver Tip: For quicker troubleshooting, you can create a special URL to turn off Pi-hole using
its API. You’ll need to find your hashed
WEBPASSWORDfrom/etc/pihole/setupVars.confand use it in a URL like this:http://<PIHOLE_IP>/admin/api.php?disable=300&auth=YOUR_HASHED_PASSWORD(this disables it for 300 seconds/5 minutes). Bookmark it or set it up with something like a Stream Deck for a one-click disable. - Keep it Ticking Over: Update Pi-hole itself regularly with
sudo pihole -up. And don’t forget to keep the underlying RaspberryPi OS up-to-date too:sudo apt update && sudo apt upgrade -y. - The “Whoa!” Moment: Get ready to be genuinely surprised (and maybe a little horrified) by just how much stuff Pi-hole blocks. It’s common to see block rates from 15% to 40%, sometimes even more, depending on how you browse and how many “chatty” gadgets you have.
The Big Question: Is Pi-hole Worth the Effort?
A resounding YES! For a pretty small investment of your time (and maybe a cheap RaspberryPi you’ve got lying around), the payoff is huge:
- Real Privacy Wins: Massively cuts down on the amount of data being collected about you.
- Internet That Feels Faster: Web pages often zip along without all the ad bloat.
- A Calmer, Quieter Web: Enjoy your content without being bombarded.
- An Extra Security Blanket: Helps block some types of malware and phishing attempts.
- You’re in Charge: You get to decide what’s allowed on your network.
Seriously, many users try Pi-hole and then can’t imagine going back. The “regular” internet starts to feel incredibly loud and nosy by comparison.
Final Thoughts
So, what’s the bottom line on Pi-hole? It’s a total game-changer, pure and simple. This isn’t just some tech experiment, it’s a seriously practical tool that makes your daily internet life cleaner, faster and way less annoying by cutting out a ton of digital noise. If you’re after a satisfying DIY project that gives you immediate and long-lasting perks, Pi-hole should be right at the top of your list.